
How Deep Do Arborvitae Roots Go? Planting Guide Inside
- July 11, 2025
- By Jason Sinclair
So, you’re thinking about planting some arborvitae, huh? They’re pretty popular for privacy hedges and adding some nice greenery to your yard. But before you get those shovels out, there’s one big question you should probably ask: how deep are arborvitae roots, anyway? Knowing about their root system is a game-changer for making sure your plants stay healthy and don’t accidentally cause problems down the road. Let’s dig into it.
Key Takeaways
- Arborvitae roots usually grow out more than they grow down, staying pretty close to the surface.
- The kind of soil you have, like clay or sand, really changes how far and deep the roots will spread.
- Planting arborvitae correctly, making sure the hole is wide enough, helps the roots grow strong.
- Watering deeply but not too often helps train the roots to go deeper, which is good for the plant.
- Different types of arborvitae, like Green Giant versus Emerald Green, have slightly different root habits.
How Deep Do Arborvitae Roots Go? Understanding Root Depth
When you’re thinking about planting arborvitae, one of the first things that might cross your mind is, “How deep do arborvitae roots go?” It’s a good question! Understanding the root depth is key to ensuring your trees thrive and don’t cause problems down the road. It’s not just about sticking them in the ground; it’s about creating an environment where they can establish strong, healthy root systems.
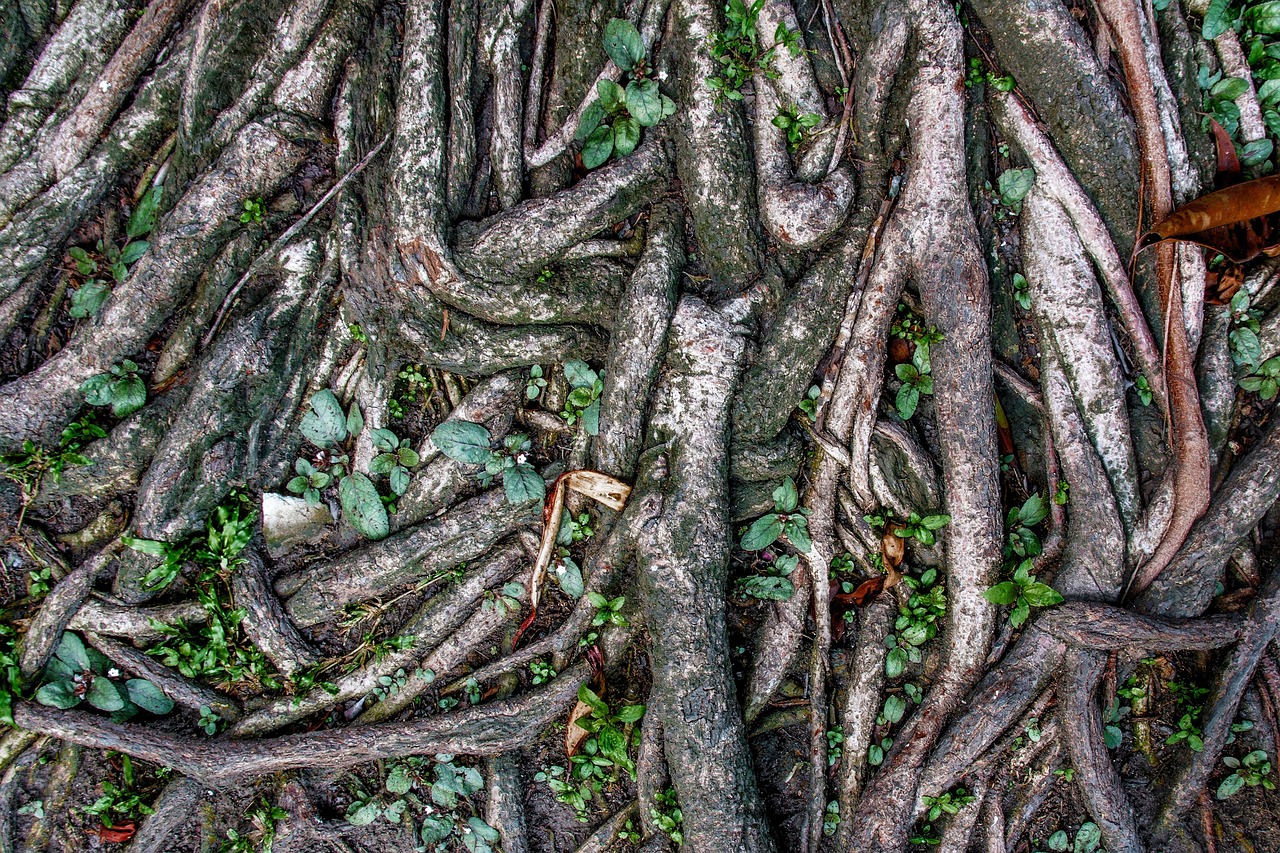
Generally speaking, arborvitae are considered to have relatively shallow root systems. This means they don’t send down a massive taproot like some other trees. Instead, they have a more fibrous root network that spreads out horizontally. But just how shallow are we talking?
Arborvitae roots typically grow to a depth of about 12 to 18 inches. This can vary a bit depending on the specific species, soil conditions, and the overall health of the tree. But that’s a good general range to keep in mind. So, do arborvitae trees have deep roots? Not really, but their widespread root system still plays a vital role in their stability and access to nutrients and water.
It’s important to remember that while arborvitae roots aren’t super deep, they can still spread out quite a bit. This is something to consider when planting near structures or other plants. You want to give them enough room to grow without causing any issues.
Knowing how deep arborvitae roots are helps you plan your planting strategy. You’ll want to dig a hole that’s wide enough to accommodate the root ball and deep enough so that the top of the root ball is level with or slightly above the surrounding soil. This prevents the tree from settling too low and potentially suffocating the roots.
How Far Do Arborvitae Roots Spread Laterally? Root Width Explained
Understanding how far arborvitae roots spread is just as important as knowing their depth. While they aren’t known for being aggressive, their lateral spread can still impact nearby structures and other plants. It’s all about planning and knowing what to expect.
Generally, arborvitae roots spread laterally about 1 to 1.5 times the height of the tree. This means a 10-foot-tall arborvitae could have roots extending 10 to 15 feet from the trunk in all directions. However, this is just a general guideline, and several factors can influence the actual spread.
Here are a few things to keep in mind:
- Variety Matters: Different arborvitae varieties have different growth habits, which affect root spread. Some are more compact, while others are more sprawling.
- Soil Type: Roots will spread more easily in loose, well-drained soil compared to compacted clay. They’ll seek out water and nutrients, so the availability of these resources will influence their growth pattern.
- Water Availability: If water is scarce, roots will spread further to find it. Conversely, if the tree is consistently watered, the roots may stay closer to the trunk.
It’s always a good idea to consider the mature size of your arborvitae when planning your landscape. Overcrowding can lead to competition for resources and impact the health of your trees. Proper spacing is key to ensuring healthy root and canopy growth.
To ensure successful planting, dig a hole that’s twice as wide as the root ball. This gives the roots plenty of room to expand initially. Also, remember to measure the root ball before planting. This will help you determine the correct planting depth and width for the hole. You want the top of the root ball to be level with, or slightly higher than, the surrounding soil line.
Species Differences: Green Giant vs Emerald Green Root Systems
Okay, so you’re probably wondering if there’s a big difference in the roots between a Green Giant and an Emerald Green arborvitae. The short answer is: yes, there is! It’s not just about the size of the tree above ground; their root systems also have distinct characteristics.
Let’s break it down:
- Green Giant Arborvitae: These guys are known for their vigorous growth, and that extends to their roots. They tend to have a more extensive and deeper root system compared to Emerald Greens. This helps them anchor themselves well and access water and nutrients over a larger area. Think of them as the powerlifters of the arborvitae world. They need a strong base to support all that growth!
- Emerald Green Arborvitae: Emerald Greens, on the other hand, have a more compact and less aggressive root system. This makes them a better choice for smaller yards or areas where you don’t want roots potentially interfering with underground utilities or structures. They’re more like the sprinters – quick and efficient, but not necessarily digging in for the long haul in the same way.
It’s important to remember that these are generalizations. Soil conditions, watering practices, and overall tree health can all influence the development of any tree’s root system. So, while Green Giants tend to have bigger roots, a Green Giant planted in poor soil might not develop as extensive a system as an Emerald Green in ideal conditions.
Here’s a quick comparison table:
| Feature | Green Giant Arborvitae | Emerald Green Arborvitae |
| Root System | More extensive, deeper | More compact, less aggressive |
| Growth Rate | Fast (3-5 ft per year) | Slow to Moderate (6-12 inches per year) |
| Mature Size | 50-60 ft tall, 15-18 ft wide | 14-16 ft tall, 4-5 ft wide |
| Best Use | Privacy screens, windbreaks, and large properties | Hedges, foundation plantings, and smaller yards |
| Potential Issues | May require more space for root development | Less drought-tolerant due to a smaller root system |
Choosing between these two really depends on your specific needs and the space you have available. If you’ve got the room and want a fast-growing screen, the Green Giant is a great option. But if you’re working with a smaller area or want something a bit more manageable, the Emerald Green privacy trees might be a better fit.
Soil Conditions & Root Penetration: Clay, Loam, and Sand Effects

Soil type plays a huge role in how well arborvitae roots can grow. It’s not just about nutrients; it’s about the physical space the roots have to move through. Some soils are easier to penetrate than others, and this directly affects the tree’s overall health and stability. Let’s break down how different soil types affect root growth.
The type of soil significantly impacts the depth and spread of arborvitae roots.
Clay Soil
Clay soil is dense and heavy. It holds water well, which can be good, but it also compacts easily. This compaction makes it tough for roots to push through. Here’s what you need to know:
- Poor drainage: Clay retains water, potentially leading to root rot if the soil stays too wet for too long.
- Compaction: The density of clay makes it hard for roots to expand and grow deeply. This can result in shallower root systems.
- Nutrient retention: Clay soils are generally rich in nutrients, but the density can make it difficult for roots to access them.
Loam Soil
Loam is often considered the ideal soil type. It’s a mix of sand, silt, and clay, offering a good balance of drainage, aeration, and nutrient retention. For arborvitae, loam provides:
- Good drainage: Loam drains well, preventing waterlogging and root rot.
- Adequate aeration: The mix of particle sizes allows for good air circulation, which is essential for healthy root growth.
- Nutrient availability: Loam retains nutrients but also allows roots to access them easily.
Sand Soil
Sandy soil is loose and drains very quickly. While it’s easy for roots to penetrate, it doesn’t hold water or nutrients well. This can lead to:
- Excellent drainage: Sandy soil prevents waterlogging, but it can dry out quickly.
- Easy penetration: Roots can easily grow through sandy soil, but they may need to spread wider to find enough water and nutrients.
- Poor nutrient retention: Sand doesn’t hold onto nutrients, so they can leach away quickly. This means you might need to fertilize more often.
When planting arborvitae, it’s important to consider your soil type and amend it if necessary. Adding organic matter like compost can improve drainage in clay soils and increase water retention in sandy soils. This helps create a better environment for root growth, no matter what type of soil you have.
To improve your soil, consider these steps:
- Test your soil: A soil test can tell you the pH level and nutrient content.
- Amend the soil: Add compost, peat moss, or other organic matter to improve soil structure and fertility. Consider using a soil conditioner for optimal results.
- Ensure proper drainage: If you have clay soil, consider adding gypsum or creating raised beds to improve drainage.
By understanding how different soil types affect root growth, you can take steps to create a healthier environment for your arborvitae to thrive. Remember to dig a hole that’s appropriately sized for the root ball to encourage proper root development.
Impact of Shallow Roots on Foundation & Pavement Safety
Arborvitae trees, while beautiful and often used for privacy screens, can sometimes pose a risk to nearby structures if their roots grow too close to the surface. While they aren’t known to be as aggressive as some other tree species, understanding the potential impact of their root systems is important for homeowners.
Shallow roots can lead to several problems, including cracked pavement and potential foundation issues. It’s all about managing their growth and choosing the right planting location.
Foundation Concerns
While arborvitae roots are not typically considered a major threat to foundations, it’s still wise to be cautious. The biggest concern arises when roots grow near a foundation and expand, potentially exerting pressure. This is more likely to be a problem with older foundations that may already have existing cracks or weaknesses. Healthy foundations are generally not affected. It’s also worth noting that arborvitae are not known to produce surface roots that could lift or crack sidewalks.
Pavement Damage
Sidewalks and driveways are more susceptible to damage from shallow tree roots. As roots grow, they can lift and crack the pavement, creating tripping hazards and costly repairs. The extent of the damage depends on the size of the tree, the type of soil, and the proximity of the tree to the pavement. Proper planning during planting can help mitigate these risks. Consider the mature size of the arborvitae, spacing, and its root system when choosing a location.
Identifying Potential Risks
Regularly inspect the area around your arborvitae trees for signs of root growth near the surface. Look for raised areas in the lawn, cracks in pavement, or any visible roots pushing through the soil. Addressing these issues early can prevent more significant damage later on.
It’s important to remember that not all arborvitae trees will cause problems. Factors like soil type, watering practices, and the overall health of the tree play a significant role in root development. By taking proactive measures and monitoring your trees, you can minimize the risk of damage to your property.
Mitigation Strategies
If you’re concerned about the potential impact of arborvitae roots, there are several steps you can take to mitigate the risks:
- Root Barriers: Install physical barriers in the soil to redirect root growth away from structures.
- Proper Watering: Encourage deep root growth by watering deeply and less frequently, rather than shallow, frequent watering.
- Careful Planting Location: Choose a planting location that provides ample space for the tree to grow without interfering with foundations or pavement.
- Regular Pruning: While you can’t prune the roots directly, maintaining the overall health of the tree can help regulate its growth. Consider contacting a Tree Arborist Grand Rapids for expert assistance.
By understanding the potential risks and taking appropriate precautions, you can enjoy the beauty and benefits of arborvitae trees without compromising the safety of your property.
How Root Depth Affects Tree Stability & Wind Resistance
Okay, so you’re probably wondering how deep those roots go and why it even matters when a big storm rolls through. Well, the depth of an arborvitae’s root system plays a huge role in how well it can stand up to strong winds. Think of it like this: the deeper the roots, the stronger the anchor. It’s not rocket science, but it’s super important.
A deeper root system provides better stability, reducing the risk of the tree toppling over during high winds.
Arborvitae with shallow roots are way more likely to get uprooted, especially if the soil is already wet or loose. That’s why understanding the root depth is key to keeping your trees (and your property) safe.
The Physics of Wind Load
When the wind hits an arborvitae, it creates a force that tries to push the tree over. The tree’s root system has to counteract that force to stay upright. A deeper root system distributes the force over a larger area, making it harder for the wind to overcome the tree’s resistance. It’s all about leverage. The taller the tree, the more leverage the wind has, and the more important those deep roots become. Think of it as a lever and a fulcrum. The wind is applying force to the lever (the tree), and the roots are acting as the fulcrum, resisting that force. A deeper fulcrum (roots) provides more stability.
Soil Type and Wind Resistance
The type of soil your arborvitae is planted in also affects its wind resistance. Sandy soils drain quickly and don’t provide as much support as clay or loamy soils. This means that arborvitae planted in sandy soils need even deeper roots to stay stable. On the other hand, clay soils can become waterlogged, which can weaken the root system and make the tree more susceptible to wind damage. It’s a balancing act. You want soil that provides good drainage but also offers enough support for the roots to anchor the tree firmly. Consider soil conditions when planting.
Signs of Poor Root Anchorage
How do you know if your arborvitae’s roots aren’t doing their job? Keep an eye out for these signs:
- Leaning: If your tree is leaning to one side, it could be a sign that the roots are not providing enough support.
- Soil Cracking: Cracks in the soil around the base of the tree can indicate that the roots are moving and the tree is unstable.
- Uprooted Roots: If you can see exposed roots, it’s a clear sign that the tree is not anchored properly.
If you notice any of these signs, it’s important to take action right away. This might involve staking the tree to provide additional support, improving the soil conditions, or even consulting with an arborist to assess the situation and recommend the best course of action.
What to Do After a Storm
After a big storm, take a walk around your property and check on your arborvitae. Look for any signs of damage, such as broken branches, leaning trees, or exposed roots. If you find any problems, address them as soon as possible to prevent further damage. For leaning trees, you might need to stake them to help them regain their upright position. For broken branches, prune them carefully to promote healthy growth. And for exposed roots, add some soil to cover them and protect them from the elements.
Planting Depth Guide: Best Practices for Arborvitae
Getting the planting depth right is super important for arborvitae. Plant them too deep, and you risk root rot; too shallow, and they might not establish well. It’s a bit of a Goldilocks situation, but with a few simple steps, you can nail it.
First off, the depth of the hole should match the height of the root ball. Don’t dig deeper, thinking you’re giving the roots extra room – that can cause problems. You want the top of the root ball to be level with, or even slightly above, the surrounding soil.
Here’s a quick rundown:
- Dig a hole as deep as the root ball.
- Make the hole twice as wide as the root ball.American Pillar Arborvitae trees need space.
- Loosen the roots gently before planting.
- Position the tree so the top of the root ball is level with the ground.
A good tip is to check for the root flare – that’s where the trunk starts to widen into the roots. Make sure this area isn’t buried. Sometimes, nurseries will have extra soil piled up around the trunk, so gently remove it to expose the root flare before planting.
Also, think about when you’re planting. The best time to plant is in late winter or early spring, before they start actively growing. This gives them time to establish before the heat of summer hits. It’s also good to know when arborvitae grow the most.
Hole Dimensions: Width & Depth for Healthy Root Growth
Okay, so you’re ready to plant your arborvitae! Don’t just dig any old hole. Getting the dimensions right is super important for healthy root development. Think of it as setting the stage for your tree to thrive. A little extra effort here pays off big time down the road.
Measuring the Root Ball
Before you even think about digging, you need to know the size of your arborvitae’s root ball. This is the clump of roots and soil that’s currently housing your tree. Use a tape measure to determine both the width and the depth. Don’t skip this step! Root ball sizes can vary, even among trees of the same height. For example, my 4′ Emerald Green arborvitae had root balls that were between 11″ and 13″ deep. Knowing this measurement is key to digging the right-sized hole.
Digging the Perfect Hole
Now for the fun part – digging! The general rule of thumb is to dig a hole that’s twice as wide as the root ball and about the same depth. This gives the roots plenty of room to spread out and establish themselves. If your root ball is, say, 1 foot wide and 1 foot tall, you’ll want a hole that’s 2 feet wide and 1 foot deep. Use a pick or a sharp shovel to break up the soil. A tape measure helps ensure you’re hitting the right dimensions. Remember to plant your arborvitae privacy trees so that the root ball is level with the ground surface, or maybe even a tiny bit above. Never plant it too deep!
Addressing Burlap
If your arborvitae’s root ball is wrapped in burlap, there’s a bit of debate about what to do. Some people remove it entirely, while others leave it on. I prefer to leave it on, but I always cut away the twine and loosen the burlap at the top of the root ball. This allows the roots to breathe and receive water more easily. Expose the top of the root ball by pulling the burlap down about 1/3 of the way.
Proper hole dimensions are non-negotiable. Too small, and the roots will be cramped. Too big, and the tree might settle unevenly. Take your time, measure carefully, and dig accordingly. Your arborvitae will thank you for it!
Planting Checklist
Here’s a quick checklist to keep in mind:
- Measure the root ball’s width and depth.
- Dig a hole twice as wide and the same depth as the root ball.
- Loosen the burlap (if applicable).
- Ensure the top of the root ball is level with or slightly above the ground.
Mulching & Mounding: Encourage Deep and Healthy Roots
Mulching and mounding are two simple, yet effective, techniques to help your arborvitae develop strong, deep roots. These practices not only conserve moisture and suppress weeds but also protect the root system from temperature extremes. Let’s explore how to use these methods to give your arborvitae the best start.
Mulching for Moisture Retention and Weed Control
Mulch acts like a blanket for the soil. It helps retain moisture, which is especially important during dry spells. It also suppresses weed growth, reducing competition for nutrients and water. A 2-3 inch layer of organic mulch, like shredded bark or wood chips, is ideal. Make sure to keep the mulch a few inches away from the trunk to prevent rot. I usually use hardwood mulch because it breaks down slowly and adds nutrients to the soil as it decomposes.
- Conserves soil moisture, reducing the need for frequent watering.
- Suppresses weed growth, minimizing competition for resources.
- Moderates soil temperature, protecting roots from extreme heat and cold.
- Adds organic matter to the soil as it decomposes, improving soil structure and fertility.
Mounding for Improved Drainage
Mounding involves creating a slightly raised planting area. This is particularly beneficial in areas with heavy clay soil or poor drainage. By raising the planting area, you improve drainage around the root ball, preventing root rot and other moisture-related problems. I’ve found that even a slight mound can make a big difference, especially for Emerald Green Arborvitae.
Choosing the Right Mulch
Not all mulches are created equal. Organic mulches, such as shredded bark, wood chips, and pine needles, are generally preferred because they decompose over time, adding nutrients to the soil. Avoid using inorganic mulches, such as rocks or gravel, as they do not provide the same benefits and can even hinder root growth. Also, be careful with certain types of wood chips; some can alter the soil pH.
Avoiding Common Mistakes
One common mistake is piling mulch directly against the trunk of the tree. This can create a moist environment that promotes rot and attracts pests. Another mistake is using too much mulch, which can suffocate the roots. Always leave a few inches of space between the mulch and the trunk, and never exceed a mulch depth of 3-4 inches. I’ve seen so many people create mulch volcanoes, and it’s just bad for the tree.
Proper mulching and mounding techniques are essential for promoting deep and healthy root development in arborvitae. By following these guidelines, you can help your trees thrive and reach their full potential. Remember to monitor the mulch level and adjust as needed to ensure optimal soil conditions.
Watering Techniques to Promote Deep Root Development
Getting the watering right is key for arborvitae, especially when you want those roots to grow deep and strong. It’s not just about how much water, but also how you water. Think of it as training the roots to reach down for moisture, instead of staying near the surface.
Here’s what I’ve learned about watering arborvitae to encourage deep root growth:
- Water deeply and infrequently: Instead of a little water every day, give your arborvitae a good soak less often. This encourages the roots to grow deeper in search of moisture. I usually aim for once or twice a week, depending on the weather. Newly planted trees need more frequent watering, but established ones can handle less.
- Use a soaker hose or drip irrigation: These methods deliver water slowly and directly to the root zone, minimizing water loss from evaporation and runoff. I’ve found that a soaker hose works great for getting water right where it needs to be.
- Check the soil moisture: Don’t just water on a schedule. Stick your finger a few inches into the soil to see if it’s dry. If it’s still moist, hold off on watering. Overwatering can be just as bad as underwatering, leading to root rot and other problems.
One thing I always keep in mind is that the goal is to encourage the roots to grow downwards. Shallow, frequent watering leads to shallow roots, which makes the tree more vulnerable to drought and wind. Deep, infrequent watering promotes a strong, healthy root system that can withstand the elements.
Here’s a simple table to guide your watering schedule:
| Tree Age | Watering Frequency | Method |
| Newly Planted | Every 1-2 days | Soaker hose/Hand |
| 1-2 Years Old | 2-3 times per week | Soaker hose/Drip |
| 3+ Years Old | Once per week | Soaker hose/Drip/Hand |
Remember to adjust this based on your local climate and soil conditions. If you’re not sure, it’s always better to err on the side of underwatering than overwatering. Arborvitae are pretty tough, and they can usually bounce back from a little dryness, but root rot is a death sentence.
Spacing Arborvitae for Optimal Root & Canopy Growth
Okay, so you’re thinking about planting some arborvitae. Great choice! But before you just start digging holes, let’s talk about spacing. Getting the spacing right is super important for both the roots and the part you see above ground. If you cram them too close, you’ll end up with root competition and a tangled mess of branches. Too far apart, and you won’t get that nice, full screen or hedge you’re probably after. It’s a bit of a balancing act, but doable.
Single Row vs. Staggered Rows
There are basically two ways to plant arborvitae if you’re going for a screen or hedge: single row or staggered rows. Single rows are pretty straightforward – you just plant the trees in a straight line. Staggered rows involve planting two rows, with the trees in one row offset from the trees in the other. Staggered rows give you quicker coverage, but they also need a wider planting area. Single rows are easier to manage in smaller spaces, but it might take a little longer to get that solid screen effect. Think about the look you want and the space you have available.
Spacing Recommendations for Different Varieties
Not all arborvitae are created equal. Some get huge, while others stay relatively compact. So, the spacing you use will depend on the specific variety you’re planting. For example, if you’re planting American Pillar Arborvitae to create a dense screen, you can get away with planting them closer together, like 3 feet apart. On the other hand, if you’re planting a larger variety like Thuja Green Giant, you’ll need to give them more room – maybe 15 feet apart – so they don’t get overcrowded as they mature. Always check the mature width of the variety you’re planting and adjust your spacing accordingly.
Impact of Spacing on Airflow & Disease Prevention
Spacing isn’t just about looks; it also affects the health of your trees. When arborvitae are planted too close together, it restricts airflow. This can create a humid environment that’s perfect for fungal diseases. Proper spacing allows air to circulate freely, which helps to keep the foliage dry and reduces the risk of disease. Plus, good airflow helps the trees get the sunlight they need for healthy growth. It’s a win-win!
Think of it like this: giving your arborvitae enough space is like giving them room to breathe. They need air, sunlight, and space to spread their roots and grow into healthy, beautiful trees. Don’t be afraid to give them a little extra room – they’ll thank you for it in the long run.
Adjusting Spacing for Faster Privacy Screens
Okay, let’s say you’re impatient and you want that privacy screen now. You can plant your arborvitae a little closer together than recommended, but there are a few things to keep in mind. First, you’ll need to be extra diligent about watering and fertilizing to make sure they have enough resources. Second, you might need to prune them more frequently to prevent overcrowding and maintain good airflow. And third, be prepared for the possibility that they might not live as long as they would if they had more space. It’s a trade-off, but it can be worth it if you need that privacy ASAP. For quick privacy, plant 3 to 4 feet apart.
Here’s a quick guide to spacing based on common varieties:
| Variety | Mature Width (approx.) | Recommended Spacing |
| Emerald Green | 3-4 feet | 3-4 feet |
| Green Giant | 15-18 feet | 15 feet |
| American Pillar | 3-5 feet | 3 feet |
| Techny (Mission) | 4-5 feet | 4 feet |
Remember, these are just general guidelines. Always do your research and adjust the spacing based on your specific needs and conditions. And don’t be afraid to ask for advice from your local nursery or garden center. They can help you choose the right variety and spacing for your landscape.
Container vs Ground Planting: Root Growth Limitations
Growing arborvitae in containers versus directly in the ground presents very different scenarios for root development. Understanding these limitations is key to ensuring the long-term health and vigor of your trees. Let’s explore the differences.
Confined Space & Root Bound Issues
In containers, the roots of an arborvitae are physically restricted. This confinement can lead to a condition known as being root-bound, where the roots circle the inside of the pot. This circling can eventually strangle the tree and limit its ability to absorb nutrients and water effectively. Regular inspection and repotting into larger containers are necessary to mitigate this issue. You might need to consider compact varieties like ‘Emerald Green’ if you’re committed to container gardening.
Nutrient Availability & Soil Volume
Container-grown arborvitae rely entirely on the nutrients provided in the potting mix. The limited soil volume means that nutrients are depleted more quickly than in the ground. Regular fertilization is essential to maintain healthy growth. In contrast, ground-planted trees can access a much larger volume of soil and a wider range of nutrients.
Water Retention & Drainage
Containers can dry out more rapidly than the ground, especially during hot weather. Proper drainage is also crucial to prevent root rot. The type of potting mix used significantly impacts water retention and drainage. Ground-planted trees benefit from the natural water table and soil composition, which provide a more stable moisture environment.
Temperature Fluctuations
Roots in containers are more exposed to temperature fluctuations than those in the ground. In winter, the soil in containers can freeze solid, damaging the roots. In summer, the soil can overheat. Insulating the containers can help to buffer these temperature extremes. Ground-planted trees are insulated by the surrounding soil, which provides a more stable temperature environment.
Container planting offers flexibility and control over the growing environment, but it demands more attention to detail. Ground planting provides a more natural and stable environment for root development, but it limits mobility and requires careful site selection.
Here’s a quick comparison:
| Feature | Container Planting | Ground Planting |
| Root Space | Limited, prone to root-bound | Extensive, natural spread |
| Nutrient Access | Limited to potting mix, requires fertilization | Wide range, natural soil composition |
| Water Retention | Dries out quickly, and drainage is critical | More stable, natural water table |
| Temperature | More extreme fluctuations | Insulated by the surrounding soil |
| Maintenance | Higher, requires repotting and fertilization | Lower, less frequent intervention needed |
Long-Term Growth Potential
Ultimately, arborvitae planted in the ground have a much greater potential for long-term growth and stability. The unrestricted root system allows them to anchor themselves firmly and access the resources they need to thrive. While container-grown trees can be beautiful and healthy for a time, they will eventually reach a point where their growth is limited by the container size. Consider the planting depth guide to ensure proper planting, whether in a container or the ground.
Identifying & Managing Shallow Roots Over Time
It’s easy to think you’re done once your arborvitae is planted, but keeping an eye on root development is important, especially as the tree matures. Sometimes, arborvitae roots can become shallow over time, which can lead to problems. Regular observation and proactive management can help prevent issues and maintain the health and stability of your trees.
One of the first things I do is check the soil around the base of the tree a couple of times a year. Look for roots that are starting to surface or become exposed. Also, pay attention to the tree’s overall health. Is it growing well? Are the needles a healthy color? Any signs of stress could indicate root problems.
Here are a few things to keep in mind:
- Regular Inspections: Check the soil around your arborvitae a few times a year for exposed roots.
- Monitor Tree Health: Look for signs of stress, such as yellowing needles or stunted growth.
- Consider Soil Amendments: Adding organic matter can improve soil structure and encourage deeper root growth.
Dealing with shallow roots can be a bit of a long game. It’s not always a quick fix, but consistent effort can make a big difference. Think of it as a regular check-up for your trees, catching small problems before they become big ones.
If you do notice shallow roots, there are a few things you can do. Mulching is a great way to protect exposed roots and help retain moisture in the soil. You can also try adding some compost or other organic matter to the soil to improve its structure and encourage deeper root growth. In some cases, you might need to consult with a certified arborist to get a professional assessment and recommendations.
Are you worried about your trees’ roots? Knowing how to spot and fix shallow roots is super important for keeping your trees healthy for a long time. If you want to learn more about how to take care of your trees, especially when it comes to their roots,check out our website. We have lots of helpful tips and tricks.
Frequently Asked Questions
How deep do arborvitae roots typically go?
Arborvitae roots usually grow about 18 to 24 inches deep. However, the depth can change based on the type of soil, how much water the plant gets, and the specific kind of arborvitae.
How far do arborvitae roots spread out from the tree?
The roots of arborvitae can spread out quite a bit, often as wide as the tree is tall. For example, a 15-foot-tall arborvitae might have roots spreading 15 feet in every direction. This helps the tree stay steady and find water.
Are there differences in root systems between Green Giant and Emerald Green arborvitae?
While both are arborvitae, Green Giant roots tend to be more widespread and deeper because the tree itself grows much larger. Emerald Green arborvitae are smaller, so their root systems are also more compact.
Does the type of soil affect how deep arborvitae roots grow?
Yes, soil makes a big difference. In loose, sandy soil, roots can go deeper and spread easily. In heavy clay soil, roots might stay closer to the surface because it’s harder for them to push through. Loamy soil, which is a mix, is usually best for deep and healthy root growth.
Can arborvitae roots damage house foundations or sidewalks?
Arborvitae roots are generally not considered very invasive. They usually don’t cause problems for foundations or sidewalks, unlike some other trees with more aggressive root systems. However, it’s always smart to plant them a good distance away from structures.
What’s the best way to encourage deep root growth for arborvitae?
To help your arborvitae grow strong, deep roots, make sure you water them deeply but not too often. This encourages the roots to search for water further down. Also, adding a layer of mulch around the base helps keep the soil moist and cool, which is good for root health.
When is the best time to plant arborvitae for good root development?
The best time to plant arborvitae is in the spring or fall. This gives the roots time to get used to their new home before the hot summer or cold winter arrives.
How big should the planting hole be for an arborvitae?
When planting, dig a hole that’s twice as wide as the root ball but only as deep as the root ball. This allows the roots to spread out easily into the surrounding soil. Make sure the top of the root ball is level with or slightly above the ground.