
How to Grow Pawpaw Trees from Seed: Step-by-Step Guide
- August 29, 2025
- By Jason Sinclair
I’ve always been fascinated by the pawpaw tree, that unique native fruit tree that tastes like a tropical delight but grows right here in North America. While buying a mature tree might give you fruit sooner, there’s a special kind of satisfaction in developing your own from seed. It’s a process that requires patience, sure, but it’s not overly complicated. I’ve learned a lot about how to grow a pawpaw tree from seed, and I’m happy to share my step-by-step guide with you.
Key Takeaways
- Pawpaw trees, scientifically known as Asimina triloba, are native to North America and produce a delicious, tropical-tasting fruit.
- Growing pawpaws from seed is a patient endeavor, with trees typically taking five to eight years to produce fruit.
- Pawpaw seeds require a cold, moist stratification period of 60 to 100 days to break dormancy, which mimics natural winter conditions.
- Young pawpaw seedlings are sensitive to direct sunlight and need shade for their first year or two of growth.
- Proper site selection with good drainage and consistent moisture is vital for pawpaw tree success, and deep containers are recommended for initial root development.
What Is a Pawpaw Tree (Asimina triloba)?
When I first heard about pawpaws, I was intrigued. It’s not every day you find a native North American fruit that tastes like a tropical vacation. The pawpaw tree, scientifically known as Asimina triloba, is a fascinating plant. It’s a small to medium-sized deciduous tree, typically growing between 15 to 25 feet tall, with a spread of about 15 feet. They’re often found in the wild as part of the understory in hardwood forests, preferring moist, well-drained soil.
What sets pawpaws apart is their fruit. The flavor is often described as a mix of banana and mango, with a creamy, custard-like texture. It’s unique. Because the fruit doesn’t last long after ripening, you won’t often see them in your average grocery store. This makes them a bit of a hidden gem.
Growing them from seed is a popular way to get started, and it’s something I’ve been looking into myself. It’s important to know that pawpaw trees aren’t self-pollinating. This means you’ll need at least two genetically different trees for them to produce fruit.
Here’s a quick look at some of the basics
- Botanical Name:Asimina triloba
- Native To: North America
- Fruit Flavor: Banana-mango, creamy texture
- Pollination: Requires two different trees
- Hardiness Zones: 5-8
While the fruit is delicious, it’s worth noting that the seeds and peel contain compounds that aren’t good for you. So, stick to enjoying that wonderful pulp.
If you’re interested in adding this unusual tree to your yard, starting from seed is a rewarding path. You can find more information on growing pawpaw trees to get a better idea of their natural habitat and needs.
Why Grow Pawpaws from Seed? Benefits and Expectations
Growing pawpaws from seed is a rewarding endeavor, though it does require a bit of patience. Unlike buying a sapling that’s already a few years old, starting from seed means you’re in for a longer wait before you see fruit. Typically, you can expect your pawpaw tree to start producing fruit anywhere from five to eight years after planting the seed. This isn’t instant gratification, but there are good reasons to go this route.
For starters, it’s a much more economical way to get multiple trees. Pawpaw fruits often contain several seeds, and with a little effort, you can get a whole batch going. It’s also a fantastic way to connect with the plant’s natural cycle. You’re not just planting a tree; you’re nurturing a life from its very beginning.
However, it’s important to manage expectations. Seeds from the same fruit can produce trees with slightly different characteristics. This means the fruit quality of a seedling tree might not be the same as the parent tree it came from. If you’re aiming for a specific fruit flavor or size, you might eventually want to graft a known variety onto your seedling tree. Also, remember that pawpaw seedlings are quite delicate when they first sprout. They need protection from direct sun for their first year or two, often doing best with some dappled shade, much like they would experience as an understory plant in nature.
Here’s a quick rundown of what to keep in mind
- Patience is key: Fruit production takes several years.
- Cost-effective: Growing from seed is cheaper than buying established trees.
- Genetic variation: Fruit quality can vary from the parent tree.
- Seedling care: Young plants need protection from harsh sun.
Starting pawpaws from seed is an exercise in delayed gratification, but the process itself is quite straightforward if you follow the right steps. It’s a great way to get a lot of trees for a low cost and to understand the plant’s life cycle.
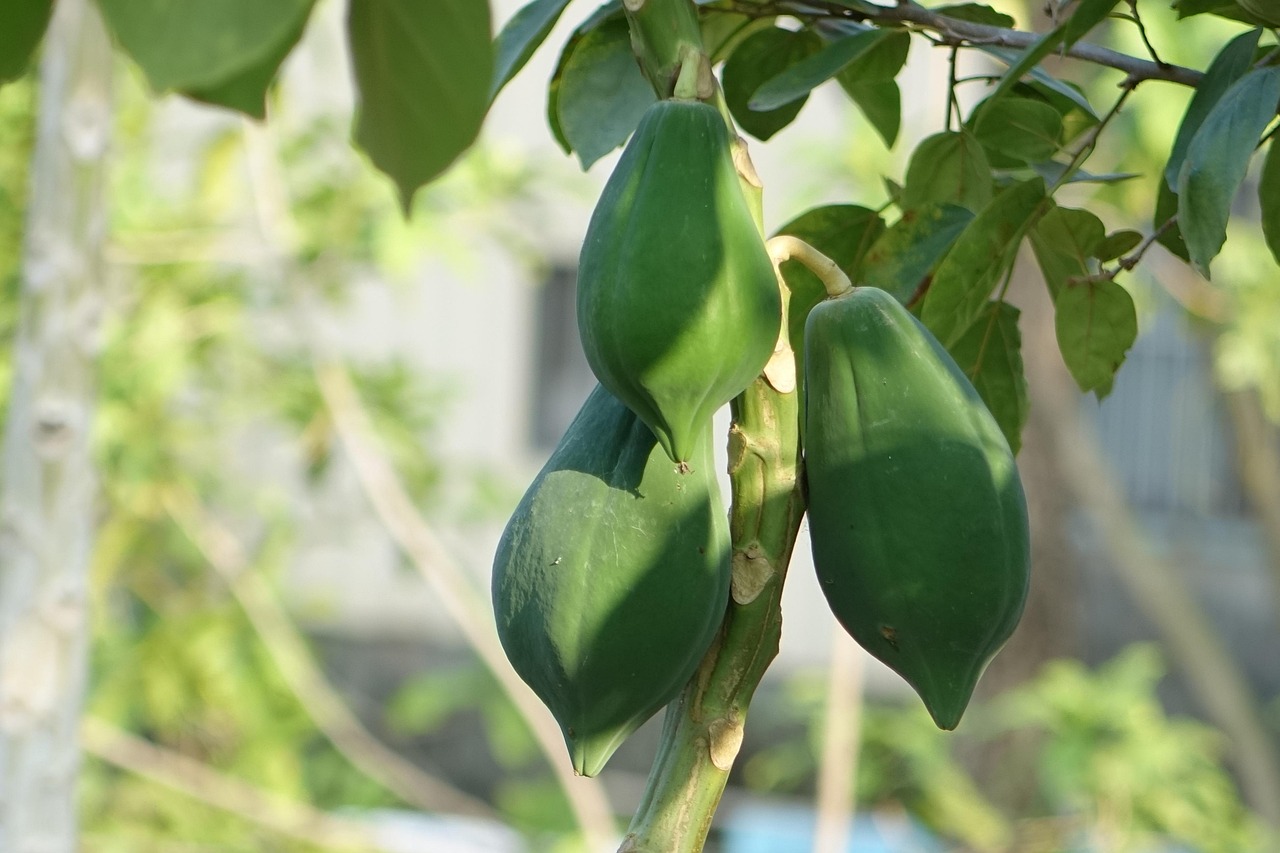
When and How to Harvest Pawpaw Seeds
When it comes to harvesting seeds for growing pawpaw trees from seed, timing is important. Pawpaws typically ripen and fall from the tree in the early to mid-autumn, usually around September or October. If you don’t have your own pawpaw tree, you might need to find a local source or a foraging spot.
The best indicator of ripeness is when the fruit naturally detaches from the branch. You can also try a gentle shake of the tree; ripe pawpaws will usually drop easily. Avoid shaking too hard, as this can dislodge unripe fruit. Once you have your pawpaws, you’ll need to get the seeds out. Slice the fruit open lengthwise and scoop out the seeds. They’ll have a slippery coating that you’ll want to remove. I usually just use a knife to gently scrape it off, but be careful, as it can be slick.
After you’ve extracted the seeds, it’s a good idea to give them a quick rinse. Some people also like to soak them briefly in a mild bleach solution to prevent mold during stratification, but a good rinse is often enough if you plan to stratify them right away. Remember, pawpaw seeds don’t like to dry out, so keep them moist from the moment you get them until you’re ready to plant them.
Cleaning and Preparing Pawpaw Seeds for Stratification
After you’ve extracted the seeds from the pawpaw fruit, the next step is to get them clean and ready for stratification. This process is straightforward, but it’s important to do it right to avoid issues down the line, like mold.
First, I like to give the seeds a good rinse under cool water. This helps remove any leftover pulp or fruit flesh clinging to them. Some people recommend a quick soak in a mild bleach solution – about 10% bleach to water – for just a minute. This is a good way to sterilize the seeds and kill off any potential fungi or bacteria that could cause problems during stratification. After the bleach soak, I rinse them thoroughly again.
- Rinse seeds under cool water.
- Optional: Soak in a 10% bleach solution for 1 minute.
- Rinse seeds again thoroughly.
I’ve found that the slippery coating around the seed, which attaches at the base, can sometimes hold onto moisture and encourage mold. While it doesn’t harm the seeds themselves, it can be a bit messy to work with. I usually try to gently scrape this off with the tip of a knife or even my fingernail, being careful not to damage the seed coat.
It’s about getting the seeds clean and free of any organic material that could break down and cause trouble later on. A little bit of care now saves a lot of headaches during the stratification period.
Cold, Moist Stratification
Pawpaw seeds, much like many other tree seeds, have a natural defense mechanism that keeps them from sprouting too early. This is called dormancy. To get them to wake up and start growing, I need to give them a period of cold and moisture. This process is known as cold, moist stratification, and it’s a requirement if I want any chance of success. Most sources, and my own experience, point to around 120 days of this treatment. It’s a good chunk of time, so planning is key.
Think of it like giving the seeds a simulated winter. They need that chill to know that spring is coming and it’s time to grow. Without it, they’ll just sit there, stubbornly dormant. This period is vital for breaking down those natural inhibitors within the seed coat. It’s a patient gardener’s game, for sure.
This cold, moist period is the most critical step in preparing pawpaw seeds for germination.
Here’s a breakdown of what I do
- Mimic Winter Conditions: The goal is to keep the seeds consistently moist but not waterlogged, and at a cool temperature, ideally between 32-40°F (0-4°C). Freezing is a no-go; it can kill the seed. I learned that the hard way one year when my pots froze solid.
- Moisture is Key: I usually use either a mix of damp sand and peat moss or just damp paper towels. The mixture should feel like a wrung-out sponge – moist enough to hold together, but not dripping.
- Container Choice: A sealed plastic bag or a container with a lid works well for the refrigerator method. This helps maintain that consistent moisture level and prevents the seeds from drying out.
- Patience: The 120-day timeline is an average. Some might take a little less, some a little more. I just mark my calendar and check periodically to make sure things are still moist.
It’s important to remember that pawpaw seeds are sensitive. They don’t like to dry out, and they certainly don’t like to freeze. Finding that balance of cool and moist, without letting things get too extreme, is the trick to successful stratification.
Stratification Techniques
When it comes to breaking the dormancy of pawpaw seeds, I’ve found there are two main approaches: using your refrigerator or trying out winter sowing. Both methods aim to give those seeds the cold, moist period they need, but they go about it a bit differently.
The refrigerator method is what I typically use when I want a bit more control over the process. I usually start this around September or October. The idea is to mimic winter conditions indoors. I’ll take my cleaned seeds and place them in a zip-top bag with some damp sphagnum moss or a mix of sand and peat. The key is to get the moisture just right – damp, not soaking wet, so mold doesn’t become an issue. Then, the bag goes into the fridge, usually in a crisper drawer, for about four months. It’s important to check on them periodically to make sure they don’t dry out. This method gives me a good sense of security, knowing they’re protected from extreme temperature swings.
Winter sowing, on the other hand, is letting nature do the heavy lifting. This involves planting the seeds directly into containers, usually around late fall or early winter. I’ll put them in deep pots, maybe 6 inches at a minimum, filled with potting mix. Then, I place these pots in an unheated garage or shed. The goal here is to expose the seeds to the natural freeze-thaw cycles of winter without letting them freeze solid. I’ve learned that freezing can be a real problem; I lost a batch one year when my containers turned into solid ice blocks. So, the garage offers protection from the harshest elements while still providing the necessary cold. I do make sure to water them lightly once a week, just enough to keep the soil from drying out completely.
Here’s a quick comparison
| Feature |
Refrigerator Method |
Winter Sowing Method |
| Control | High; you manage moisture and temperature. | Lower relies on natural weather patterns. |
| Timing | Start indoors in the fall for spring germination. | Plant outdoors in fall/early winter. |
| Protection | Protects from extreme cold and drying. | Protects from extreme cold but requires monitoring. |
| Effort | Requires periodic checks and moisture management. | Requires weekly watering and placement monitoring. |
Both methods require patience. Pawpaw seeds are notoriously slow to germinate, often not showing signs of life until mid-summer, even after proper stratification. Don’t get discouraged if you don’t see sprouts right away; it’s normal for them to take their time. I’ve found that keeping the soil consistently moist, but not waterlogged, is key during this waiting period. If you’re looking for a good potting mix, consider something well-draining, as soggy soil can lead to problems. For those interested in starting their pawpaw journey, understanding the needs of these unique seeds is a great first step towards growing your own pawpaw trees.
Choosing the Right Container
When I start pawpaw seeds, I always think about what kind of home they’ll need for their first year or so. Pawpaws are a bit unique because they send down a long taproot before they even think about putting up a shoot. This means that regular, shallow seed-starting trays just won’t cut it. If that taproot hits the bottom of a shallow container, it can get bent or kinked, which is called “J-rooting.” This can stunt the plant’s growth later on, or even cause problems down the road. So, I always go for deep pots.
What kind of deep pots, you ask? Well, I’ve found that anything at least 10 to 14 inches deep works well. Some people use specialized “tree pots” that are open at the bottom, which is neat because it lets the roots grow right out. Others get creative with things like cut-up milk cartons (make sure to poke drainage holes!) or even poster tubes cut to size. The main thing is to give that taproot plenty of room to stretch out without hitting a wall.
Here’s a quick rundown of what I look for
- Depth: Aim for a minimum of 10 inches, but 12-14 inches is even better.
- Drainage: Good drainage is a must. Make sure whatever container you choose has holes in the bottom.
- Material: Plastic pots are fine, but fabric pots or those open-bottom tree pots can help prevent circling roots.
The goal here is to let that initial taproot grow straight down without any obstruction. This sets the stage for a healthy, strong root system that will support the tree for years to come.
I usually fill these deep pots with a good potting mix, leaving a little space at the top. Then, I plant the stratified seeds about an inch or two down. It might seem like a lot of soil for a tiny seed, but trust me, that taproot needs the space.
Planting Stratified Seeds
After your pawpaw seeds have gone through their cold stratification period, it’s time to get them into their pots. I’ve found that using deep containers is important here. Pawpaws develop a long taproot right from the start, and if that root hits the bottom of a shallow pot, it can get stunted or even damaged. I usually reach for pots that are at least 10 inches deep, but 14 inches is even better. This gives the taproot plenty of room to grow downwards without any issues.
When it comes to the soil, I like to use a mix that drains well but still holds some moisture. A good quality potting mix, maybe with a bit of perlite or vermiculite added, works well for me. I fill my pots, leaving a couple of inches at the top, and moisten the soil so it’s damp but not waterlogged. Then, I gently place the stratified seeds on the surface of the soil. I aim to plant them about 1 to 2 inches deep, covering them with that same moist potting mix. After covering, I give the soil a gentle press to make sure there’s good contact between the seed and the soil.
Here’s a quick rundown of my planting process
- Prepare deep pots (at least 10 inches deep).
- Fill pots with a well-draining, moist potting mix.
- Place stratified seeds on the soil surface.
- Cover seeds with 1-2 inches of soil.
- Gently firm the soil.
It’s important to remember that these seeds have been in a cold, moist environment. Once planted, they still need consistent moisture and protection from extreme temperatures. I usually place my newly potted seeds in a spot that gets some morning sun but is protected from harsh afternoon heat.
The key is to keep the soil consistently moist, much like it was during stratification, but avoid waterlogging. Too much water can lead to rot, while letting them dry out can undo all the stratification work.
Ideal Growing Conditions for Seedlings
Once your pawpaw seeds have successfully germinated and you have tiny seedlings, it’s time to think about where they’ll be happiest. Pawpaw seedlings are a bit delicate, especially when they’re young. They don’t like direct, harsh sunlight. Think of them like little forest dwellers; they prefer the dappled light you’d find under a canopy of larger trees. If you put them out in full sun right away, you’ll likely scorch those tender leaves, and that’s a quick way to lose a seedling.
So, what does this mean for their growing conditions? You’ll want to provide them with shade, at least for their first year or two. A spot that gets morning sun but is protected from the hot afternoon sun is usually ideal. This could be on the east side of a building or under a taller, established tree. If you’re growing them in containers, you can move them around to find the perfect light balance.
Water is also super important. Pawpaw seedlings need consistently moist soil, but not soggy. You don’t want them drying out completely, but you also don’t want them sitting in water, which can lead to root rot. I usually check the soil by sticking my finger in about an inch deep. If it feels dry, it’s time to water. The amount you water will depend on the weather, the size of your pot, and the soil type, so it’s good to get a feel for it.
Here’s a quick rundown of what I aim for
- Light: Partial shade, especially protection from intense afternoon sun.
- Water: Keep soil consistently moist, but not waterlogged. Check soil moisture regularly.
- Soil: Well-draining, slightly acidic, and rich in organic matter. A good potting mix usually works well for container-grown seedlings.
Remember, these little guys are building their root systems in the early stages. Providing the right environment now will set them up for stronger growth later on. It’s all about mimicking their natural habitat as an understory plant.
As they get a bit bigger, you can gradually introduce them to more sunlight, but always do it slowly. You don’t want to shock them. Think of it as a gradual transition, not a sudden change. This careful attention to light and water will help your pawpaw seedlings thrive.
Germination Timeline
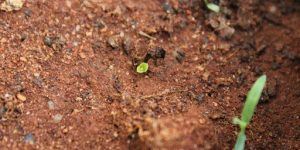
So, you’ve gone through the stratification process, and now you’re waiting for those pawpaw seeds to wake up. Patience is definitely the name of the game here. Pawpaw seeds are notoriously slow to germinate, and it’s easy to get discouraged if you don’t see anything happening right away. I’ve found that germination can take anywhere from a few weeks to several months after planting.
Generally, if you’ve followed the cold, moist stratification for the recommended 70-100 days and then planted them in a warm spot (around 75-85°F or 24-29°C), you might see the first signs of life within 2-3 weeks. However, this is often just the root emerging. The shoot, the part that actually breaks the soil surface, can take much longer, sometimes up to two months after the root appears.
Here’s a rough timeline of what I’ve observed
- Weeks 1-4 Post-Planting: You might see the taproot emerge. It’s a white, fleshy root that will grow downwards. Don’t expect much to happen above the soil yet.
- Months 1-3 Post-Planting: The shoot should start to emerge from the soil. This is the exciting part! Remember, growth above ground is very slow initially as the plant focuses on developing its root system.
- First Year: Expect slow, steady growth. The seedling might only get a few inches tall. This is normal; the plant is building a strong foundation.
- Second Year: Growth usually picks up a bit, but it’s still not rapid. The plant is still prioritizing root development.
It’s important to remember that germination isn’t always uniform. Some seeds might sprout quickly, while others lag behind.
I’ve learned that the biggest mistake people make is giving up too soon. Pawpaws are not like fast-growing annuals; they require a long-term commitment. Trust the process, keep the soil consistently moist but not waterlogged, and provide adequate warmth and light. The reward of growing your own pawpaw tree is well worth the wait, and eventually, you could be harvesting fruit from your own tree, which typically starts around five to eight years after planting.
If you’re winter sowing, the timeline might shift slightly, with germination occurring in late spring or early summer. The key is consistent moisture and protection from extreme temperatures. For those who stratify in the refrigerator, planting in early spring should lead to germination throughout the late spring and summer months. Just keep them in a warm location and be patient. You can find more information on pawpaw tree care to help you along the way.
Transplanting and Managing Seedlings
Once your pawpaw seeds have successfully sprouted and you’ve nurtured them in their initial containers, it’s time to think about their next move. Transplanting is a key step, and doing it right can make a big difference in how well your young trees establish themselves. I usually wait until the seedlings are a few inches tall, and importantly, have developed a decent root system. Remember, pawpaws grow a long taproot first, so those deep pots we talked about earlier are important for this stage.
When it comes to moving them, whether it’s to a larger pot or directly into their final garden spot, timing is everything. Fall is generally the best season for transplanting trees. The cooler weather means less stress on the young plant, and it gives the roots a chance to settle in before winter hits. If you’re moving them to a permanent location, pick a spot that gets decent sun but also some afternoon shade, especially when they’re young. They need consistent moisture, so avoid places that dry out too quickly.
Here’s a general approach I follow
- Prepare the new location: Dig a hole that’s wider than the seedling’s root ball, but not necessarily deeper. Loosen the soil at the bottom and sides.
- Gently remove the seedling: Carefully slide the seedling out of its current pot. If it’s in a biodegradable pot, you can often plant the whole thing, but make sure the top edge is below the soil line to prevent it from wicking moisture away.
- Place the seedling: Position the seedling in the new hole so the top of the root ball is level with the surrounding soil. Avoid planting too deeply, as this is a common mistake that can harm the tree.
- Backfill and water: Fill the hole with the soil you removed, gently firming it around the roots. Water thoroughly to settle the soil and eliminate air pockets.
If you’re not planting them out permanently yet, moving them to larger containers is a good option. This allows the taproot more room to grow without becoming pot-bound. I often use taller pots, like 1-gallon or even 3-gallon sizes, to accommodate that developing taproot.
It’s important to remember that pawpaw seedlings grow quite slowly for the first year or two. This is normal, as they are busy developing a strong root system. Be patient and continue to provide consistent watering and adequate light.
For those moving seedlings to their permanent garden spots, remember to give them enough space. Planting them about 8 feet apart is a good starting point. Also, be mindful of transplant shock. Providing temporary shade for the first few weeks can help them adjust. I’ve found that a little bit of balanced fertilizer, applied according to the package directions, can also give them a good start. Just be sure to water them well after fertilizing. Growing pawpaws from seed is a journey, and this transplanting stage is a significant milestone. You can find more information on successful pawpaw cultivation if you need further guidance.
Long-Term Care
Once your pawpaw trees are established, keeping them happy involves a few key things. For soil, I’ve found they prefer something that drains well but also holds onto some moisture. Think of that forest floor where they naturally grow – rich and a bit damp, but not waterlogged. A slightly acidic pH is usually best. I usually add a layer of compost or mulch around the base each year; it helps keep the soil healthy and holds in that needed moisture, especially for the younger ones.
Now, about getting fruit – this is where it gets interesting. Pawpaw flowers are a bit tricky. They’re designed so the female part ripens before the male pollen is ready, meaning they generally don’t pollinate themselves. Plus, they’re usually incompatible with their own pollen, so you need at least two different pawpaw trees for cross-pollination. If you’re relying on nature, the usual pollinators like flies and beetles aren’t always the most reliable. I’ve had the best luck with hand-pollination. It’s not too hard: grab a small, soft brush, collect pollen from one tree when the anthers look brown and crumbly, and then gently transfer it to the stigma of a flower on a different tree when the pistil tips look green and shiny. Don’t go overboard with pollination, though; too much fruit can stress the tree and lead to smaller fruits or even broken branches.
As for when you can expect fruit, patience is key. Seed-grown trees typically start producing fruit when they reach about six feet tall, which usually takes anywhere from five to eight years. It can sometimes take a bit longer, so just keep providing good care, and they’ll get there.
Here’s a quick rundown of what to keep in mind
- Soil: Well-drained, slightly acidic, and rich in organic matter. Keep it consistently moist.
- Pollination: Requires at least two genetically different trees. Hand-pollination is often recommended for better fruit set.
- Fruiting Time: Expect fruit in 5-8 years from seed-grown trees, once they reach about 6 feet tall.
Remember that trees grown from seed won’t necessarily produce fruit identical to the parent tree. If you’re aiming for specific fruit characteristics, you might consider grafting later on.
Common Challenges
While pawpaw trees are generally tough once they get going, I’ve run into a few snags along the way, and I bet you might too. One thing I’ve noticed is that young seedlings can be a bit susceptible to mold, especially if the soil stays too wet or if there isn’t enough air circulation. It’s a bummer when you’ve put in all that effort, and then a fuzzy gray or white growth shows up. To keep this at bay, I make sure my seed-starting mix drains well and I try not to overwater. Sometimes, a light dusting of cinnamon on the soil surface can help too, as it has some natural antifungal properties.
Wildlife can also be a nuisance. Deer, bless their hearts, usually leave the leaves and twigs alone because the plant is a bit toxic. However, they love the fruit once it starts to ripen and drops. I’ve also had bucks rub their antlers on young trees during the fall rut, which can damage the bark. To protect my saplings, I often use tree guards or stakes with mesh around them, especially for the first few years. It’s not the prettiest thing, but it saves the tree.
- Mold: Prevent by ensuring good drainage and avoiding overwatering. Consider cinnamon on the soil surface if you see early signs.
- Wildlife: Protect young trees with guards against deer rubbing antlers. Fence off ripening fruit if animals like squirrels, raccoons, or birds are a problem.
- Disease: Pawpaws are fairly resistant, but powdery mildew can sometimes appear as white patches on leaves. Good air circulation helps. If it becomes a problem, a neem oil or copper-based spray can be used, but I try to avoid sprays unless necessary.
I’ve found that a lot of these issues are more common when the trees are stressed, either from being planted in the wrong spot, having poor soil, or not getting enough water. Keeping them healthy from the start seems to be the best defense against most problems.
As for specific pests, the pawpaw peduncle borer is a tiny moth larva that can burrow into the flowers, causing them to drop. It’s hard to control directly, but healthy trees with plenty of flowers are more likely to withstand some loss. The zebra swallowtail butterfly is another one; its caterpillars eat the leaves. Honestly, they’re pretty to watch, and they rarely eat enough to cause real harm to a healthy tree. I just let them be. The fruit itself can sometimes get hard, black patches, which are usually a fungus, but it doesn’t seem to affect the taste much. I just cut those bits off if they bother me.
Keeping your trees healthy means watching out for common problems like mold, unwanted critters, and sickness. These issues can weaken your trees and make them look bad. Want to learn more about how to keep your trees strong and safe? Visit our website for expert tips and services to protect your trees.
Frequently Asked Questions
How do I prepare pawpaw seeds to make sure they sprout?
I’ve found that pawpaw seeds need a period of cold and dampness to wake up, which usually lasts for about 2 to 3 months. This process, called stratification, can be done by planting the seeds directly in the ground in the fall and letting nature take its course. Alternatively, I keep my seeds in a moist paper towel inside a sealed bag in the refrigerator during winter. Both methods help the seeds get ready to sprout when warmer weather arrives.
How long will it take for a pawpaw tree grown from seed to produce fruit?
Pawpaw trees are known for taking their time to produce fruit when grown from seed. I typically expect to wait about five to eight years before I see any fruit. It’s a bit of a waiting game, but the unique flavor of the pawpaw is worth the patience, in my opinion.
What kind of pots should I use for pawpaw seeds?
When I start pawpaw seeds, I use deep pots, at least 10 inches long. Pawpaw seeds tend to send down a long main root, called a taproot, before they grow much above the soil. Giving this taproot plenty of room helps prevent it from getting bent or twisted, which can cause problems for the tree later on.
How should I keep pawpaw seeds moist during storage?
Pawpaw seeds need to be kept moist but not soaking wet. If they dry out, their chances of sprouting can be greatly reduced. I’ve found that using damp sphagnum moss or paper towels in a sealed bag works well for keeping them at the right moisture level during stratification.
Do young pawpaw trees need shade?
I’ve noticed that young pawpaw seedlings are very sensitive to direct sunlight and can be harmed or even killed by it. Because of this, I make sure to provide them with shade for their first year or two. Planting them where they get dappled shade or partial sun is usually a good idea.
Are pawpaw trees difficult to grow because of pests or diseases?
Yes, pawpaw trees are generally quite hardy and don’t have too many issues with pests or diseases. However, I have seen powdery mildew on the leaves sometimes. A simple treatment with something like neem oil can usually take care of it. Animals like squirrels and birds also enjoy the fruit, so you might need to protect your harvest if they become a problem.
When is the best time to transplant pawpaw seedlings?
When I transplant pawpaw seedlings, I usually do it in the fall. The cooler weather means the young trees won’t need as much water and can focus on growing their roots before winter sets in. It’s important to handle them carefully because they don’t always transplant the best.
What are your best tips for getting a high germination rate from pawpaw seeds?
I’ve had great success with germination rates above 90% by following specific steps. This involves getting seeds from fully ripe fruit, keeping them consistently moist and cold for stratification, and then planting them in deep pots. Patience is key, as they can take a little while to show signs of life after planting.